Tuesday, February 28, 2012
Frenchy Vanity Chair
So here is a little vanity chair I painted and re-covered the seat. Of course the graphics are from "The Graphics Fairy"! This was a fun and easy project to do, now just want to make a little pillow to go with it.
Monday, February 20, 2012
Fairy in a jar
So I have always had a love for fairies since childhood. So many of the stories about fairies would spark my imagination and I would lapse into some of the most wonderful daydreams. Growing up I was sick a lot and had to spend most of the time indoors entertaining myself. Wanted to make something with a nod towards childhood dreams and imaginary friends.....
Wednesday, February 8, 2012
"A woman can accomplish so much when wearing a tiara"
Here is one of my latest creations, a coffee filter wreath. This has been dyed with tea and coffee, then added vintage lace, pearls an antique skeleton key , and graphics from "The Graphics Fairy" . This was so much fun to make, I sure hope this goes to a good home!
D-Constructed shirts
Ok so it all started with being asked to participate in a Golf Tournament for charity. I was asked to wear the black shirt (Last picture) and represent the company on a certain hole. So when I looked at the boring guy shirt I was given, had to do something to make it better. This was the first one, as you can see this lead to trying different designs and seeing how many ways can you deconstruct a T-shirt.
Have deconstructed some formal gowns as well, mostly for costumes though. Really love to explore and see where my imagination will take me.
This was 2 years ago, and haven't really stopped creating since.........
Monday, February 6, 2012
Paris themed wreath
So here are some pictures of on of my wreaths made some time back. I used coffee filters, some dyed a very delicate shade of oink some left white. Used Vintage lace and pearls, made some fabric flowers, threw in a skeleton key, buttons and graphics from "The Graphics Fairy". Will post more of the latest one, enjoy!
Violet

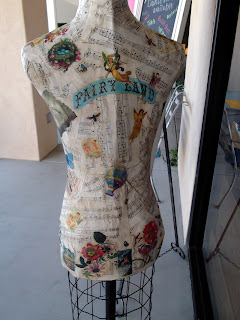
So here is my re-post of the dress form I built, Violet. This is re-post is part of linking to Carol, from "The Polka Dot Closet" and her Dress form Ball. What a great idea, she has one of the most amazing Blogs out there! I'm sure you will be inspired when you visit her site, just as I have been.
Made "Violet" by covering "Cupcake" with a few layers of plastic wrap to protect her from being damaged. Next I layered craft paper dipped in wall paper paste and proceeded to cover "Cupcake" . This layer was left to dry for approx. 24 hours. Then I continued to add 3 more layers, letting them dry in between. After this was dry , I cut down the back and very carefully took her off the form underneath. This took some patience on my part since I didn't want to damage either form.
Cut a piece of wood to fit just inside the bottom of the form, used a plumbing floor flange and pipe from hardware store that was screwed in the wood , then screwed the form onto the wood and added a tiki torch stand to create base.
Next covered the back seam with more craft paper and wall paper paste, then decoupaged old sheet music and graphics, mostly from "The Graphics Fairy" added a wooden finial to top and she was done. "Violet" is very strong and her base can unscrew if needed , she was such a fun project, found the idea by using "Google" to get ideas. Wish I knew exactly what sites they were, but can't remember-sorry. Hope this inspires you to create something wonderful. :)http://thepolkadotcloset.blogspot.com/2012/02/dress-form-linky-party-starts-now-and.html
Subscribe to:
Comments (Atom)


.jpg)

.jpg)


